AI人材になるぞ!
機械学習が最近流行ってますね。 興味があったので遊んでみることにしました。 僕もAI人材になるぞ! (なりません)(決して某振がつらくて現実逃避をしているわけではない)
とはいえ、実は3年ほど前にも手を出したことがあり、当時は手書き文字認識を書いたりしていたのですが、つらすぎてやめてしまい、3年ぶりのチャレンジです。 (D言語でフルスクラッチで書いた)(行列の演算とかから全部書いたので辛かった)(リポジトリも消してしまった)(手書き文字認識できて満足してしまった)
今回はおとなしくライブラリを使いました。 何がよいかよくわからなかったので、とりあえずChainerを使いました。
手書き文字の認識ばっかりしてもアレなので、画像分類をしてみます。 ほとんど既存のものを使っているので、そんなに内容はありません。 これからぼちぼち勉強していこうという気持ちです。
ソースは以下に公開しています。 ちなみにnobeliumは原子番号102の元素で、アルフレッド・ノーベルにちなんで名付けられた元素です。
まず、始める前にこの青い本を一通り読みました。

- 作者: 岡谷貴之
- 出版社/メーカー: 講談社
- 発売日: 2015/04/08
- メディア: 単行本(ソフトカバー)
- この商品を含むブログ (13件) を見る
とりあえず畳み込んでいくんだなという感じです。
今回は102枚の花の分類をしてみます。 なぜこれにしたかというと、僕はお花が好きで、たまたまここにデータセットがあったからです。
Visual Geometry Group Home Page
データの取得・処理
data.pyにはデータ関連の処理をまとめています。
後述しますが、学習をしたりするのはEC2のスポットインスタンスを使います、貧困大学院生なので。 ボリュームは毎回消すため、毎回データを取得したりする必要があります。 なのでそこらへんの処理も書いていきます。
まず、先程のUniversity of OxfordのWebから花の画像とラベルを取得してきます。
DataPath = path.join(path.dirname(__file__), "data")
FlowerImagesDirectory = path.join(DataPath, "flowers")
LabelsPath = path.join(DataPath, "labels.csv")

def fetch_flowers():
    if path.isdir(FlowerImagesDirectory):
        return True
    if not path.exists(DataPath):
        os.mkdir(DataPath)
    tgz_path = path.join(DataPath, "102flowers.tgz")
    if not path.isfile(tgz_path):
        url = "http://www.robots.ox.ac.uk/~vgg/data/flowers/102/102flowers.tgz"
        try:
            urllib.request.urlretrieve(url, tgz_path)
        except urllib.error.URLError:
            return False
    extract_tar(tgz_path, DataPath)
    jpg_path = path.join(DataPath, "jpg")
    if not path.exists(jpg_path):
        return False
    os.rename(jpg_path, FlowerImagesDirectory)
    return True


def fetch_labels():
    if path.isdir(LabelsPath):
        return True
    mat_path = path.join(DataPath, "imagelabels.mat")
    if not path.isfile(mat_path):
        url = "http://www.robots.ox.ac.uk/~vgg/data/flowers/102/imagelabels.mat"
        try:
            urllib.request.urlretrieve(url, mat_path)
        except urllib.error.URLError:
            return False
    mat = scipy.io.loadmat(mat_path)
    labels = mat["labels"][0]
    images = ["image_{:05}.jpg".format(i + 1) for i in range(len(labels))]
    df = pd.DataFrame({"image": images, "label": labels})
    df.to_csv(LabelsPath)
    return True


def extract_tar(tar_path, extract_path):
    tar = tarfile.open(tar_path, 'r')
    for item in tar:
        tar.extract(item, extract_path)
        if item.name.find(".tgz") != -1 or item.name.find(".tar") != -1:
            extract_tar(item.name, "./" + item.name[:item.name.rfind('/')])
取得した画像は、事前処理を行います。
pre_process_dataでは、引数で与えられた長さを持つ正方形に画像に変換しています。
pre_process.logというところに切り出すサイズを出力して、もし事前に切り出し処理がされていたらしないようにしています(これは正直不要だった)
PreProcessedFlowerImagesDirectory = path.join(DataPath, "processed_flowers")

def pre_process_data(image_size):
    pre_process_log_path = path.join(DataPath, "pre_process.log")
    try:
        with open(path.join(pre_process_log_path)) as f:
            size = f.read()
            if image_size == int(size):
                return True
    except ValueError:
        pass
    except FileNotFoundError:
        pass
    if path.exists(PreProcessedFlowerImagesDirectory):
        shutil.rmtree(PreProcessedFlowerImagesDirectory)
    os.makedirs(PreProcessedFlowerImagesDirectory)
    if path.exists(MeanPath):
        os.remove(MeanPath)
    for f in tqdm(os.listdir(FlowerImagesDirectory)):
        img = Image.open(path.join(FlowerImagesDirectory, f))
        crop_size = min(img.width, img.height)
        img = img.crop(((img.width - crop_size) // 2, (img.height - crop_size) // 2,
                        (img.width + crop_size) // 2, (img.height + crop_size) // 2))
        img = img.resize((image_size, image_size))
        img.save(path.join(PreProcessedFlowerImagesDirectory, f))
    calc_mean()
    with open(pre_process_log_path, "w") as f:
        f.write("{}".format(image_size))
    return True
このとき、calc_meanをしています。
これは正規化のための、全ての画像の平均を求める処理です。
この平均を求める処理では、get_datasetsを呼んでいます。
MeanPath = path.join(DataPath, "mean.npy")

def get_datasets():
    labels = pd.read_csv(LabelsPath, index_col=0)
    # label: 1 -> 102
    ds = datasets.LabeledImageDataset(list(zip(labels["image"], labels["label"] - 1)), PreProcessedFlowerImagesDirectory)
    return datasets.split_dataset_random(ds, int(len(ds) * 0.8), seed=SplitDatasetSeed)


def calc_mean():
    if os.path.exists(MeanPath):
        return np.load(MeanPath)
    train, _ = get_datasets()

    mean = np.mean([img[:3] for img, _ in train], axis=0)

    np.save(MeanPath, mean)
    return mean
get_datasetsは、事前処理された画像を、訓練データとテストデータに分けて返すものです。
chainer.datasets.split_dataset_randomがいい感じにやってくれます。
このseedに同じ値を渡せば、同じように分割されるので、calc_meanから呼んでもどこから呼んでも同じ訓練データとテストデータが返ってきます。
model
でぃーぷらーにんぐのぶれいんであるところのモデルです。
今回はResNet-50を使ってみます。
なぜResNet-50にしたかというと、chainer.linksにあって、ここの比較でOperationsとAccuracyが良さそうだったからです。
[1605.07678] An Analysis of Deep Neural Network Models for Practical Applications
独り言ですが、オープンアクセスの論文って良いですね。
ResNet-50を使うことにしたわけですが、0から学習をするのはつらそうなので、先人たちが学習して公開してくれている重みを使わせていただき、それから少しだけ学習するという感じでいきます。 「ファインチューニング」ってやつです。
Chainerで転移学習とファインチューニング(VGG16、ResNet、GoogLeNet) - Qiita
モデルはmodels/resnet50_v1.pyに記載しています。
v1なのは、ここから更に改良するつもりだったからです。(結局しなかった)
import os

import chainer
from chainer import links

import chainer_utils


class ResNet50V1(chainer.Chain):
    def __init__(self, class_labels):
        super(ResNet50V1, self).__init__()
        self.fetch_model()

        with self.init_scope():
            self.base = links.ResNet50Layers()
            self.fc6 = links.Linear(None, class_labels)

    def __call__(self, x):
        h = self.base(x, layers=['pool5'])['pool5']
        return self.fc6(h)

    @staticmethod
    def fetch_model():
        return chainer_utils.download_pre_trained_caffemodel(
            "https://s3-ap-northeast-1.amazonaws.com/hayashikun/ResNet-50-model.caffemodel",
            os.path.join(chainer_utils.PreTrainedModelsDirectory, "ResNet-50-model.caffemodel")
        )
chainerのResNetのモデルはこんな感じになっています。
chainer/resnet.py at master · chainer/chainer · GitHub
今回は、最後のfc6だけを学習するような感じにします。
fc6以外を固定するのは後述のmodel.base.disable_update()です。
学習済みデータは↓を使います。
GitHub - KaimingHe/deep-residual-networks: Deep Residual Learning for Image Recognition
なんかダウンロードリンクがOneDriveのものになっていてやりにくいので、S3にあげてそこからダウンロードするようにしました。
それがfetch_modelです。
このモデルを図で出すと↓みたいな感じです。(めっちゃ重い)(見ても特に何もわからない)
https://s3-ap-northeast-1.amazonaws.com/hayashikun/flowers_nobelium/cg.png
training
訓練をしたりします。 v1なのは(ry
import argparse
from os import path

import chainer
from chainer import training
from chainer.training import extensions

import data
import models
import output


def main():
    parser = argparse.ArgumentParser(description="Learning from flowers data")
    parser.add_argument("--gpu", "-g", type=int, default=-1, help="GPU ID (negative value indicates CPU")
    parser.add_argument("--init", help="Initialize the model from given file")
    parser.add_argument('--job', '-j', type=int, help='Number of parallel data loading processes')
    parser.add_argument("--resume", '-r', default='', help="Initialize the trainer from given file")
    args = parser.parse_args()

    batch = 32
    epoch = 50
    val_batch = 200
    model = models.ResNet50V1(data.ClassNumber)
    if args.init:
        print('Load model from', args.initmodel)
        chainer.serializers.load_npz(args.init, model)
    if args.gpu >= 0:
        chainer.backends.cuda.get_device_from_id(args.gpu).use()
        model.to_gpu()

    if data.fetch_flowers() and data.fetch_labels():
        print("Flower images and labels have been fetched.")
    else:
        print("Failed to fetch flower images and labels")
        return

    data.pre_process_data(224)

    output_name = output.init_train(model.__class__)
    output_path = path.join(output.OutPath, output_name)

    train, validate = data.get_datasets()

    train_iter = chainer.iterators.MultiprocessIterator(train, batch, n_processes=args.job)
    val_iter = chainer.iterators.MultiprocessIterator(validate, val_batch, repeat=False, n_processes=args.job)

    classifier = chainer.links.Classifier(model)
    optimizer = chainer.optimizers.Adam()
    optimizer.setup(classifier)
    model.base.disable_update()

    updater = training.updaters.StandardUpdater(train_iter, optimizer, device=args.gpu)
    trainer = training.Trainer(updater, (epoch, 'epoch'), output_path)

    val_interval = 500, 'iteration'
    log_interval = 250, 'iteration'
    snapshot_interval = 5000, 'iteration'

    trainer.extend(extensions.Evaluator(val_iter, classifier, device=args.gpu), trigger=val_interval)
    trainer.extend(extensions.dump_graph('main/loss'))

    trainer.extend(extensions.snapshot(), trigger=snapshot_interval)
    trainer.extend(extensions.snapshot_object(model, 'model_iter_{.updater.iteration}'), trigger=snapshot_interval)

    trainer.extend(extensions.LogReport(trigger=log_interval))
    trainer.extend(extensions.observe_lr(), trigger=log_interval)
    trainer.extend(extensions.PrintReport([
        'epoch', 'iteration', 'main/loss', 'validation/main/loss',
        'main/accuracy', 'validation/main/accuracy', 'lr'
    ]), trigger=log_interval)
    trainer.extend(extensions.ProgressBar(update_interval=10))

    if args.resume:
        chainer.serializers.load_npz(args.resume, trainer)

    print("Start training")
    trainer.run()

    model.to_cpu()
    chainer.serializers.save_npz(path.join(output_path, "model.npz"), model)
    print("Uploading files")
    output.upload_result(output_name)
    print("Finish training")


if __name__ == '__main__':
    main()
画像の事前処理では、画像サイズを224にしています。(cf: deep-residual-networks)
あとは学習が終わったらchainer.serializers.save_npz(path.join(output_path, "model.npz"), model)をして、学習したモデルを保存しています。
output
学習の結果はS3に保存します。
output.pyに諸々の処理を書いています。
訓練を開始するときは、init_trainでまずS3にディレクトリを作ります。
このとき、リポジトリのcommit hashを入れたログを出しています。
upload_resultで諸々のログとか学習済みのモデルとかをS3にアップロードしています。
OutPath = os.path.join(os.path.dirname(__file__), "out")
GitPath = os.path.join(os.path.dirname(__file__), ".git")
S3Path = "flowers_nobelium"


def init_train(model_class):
    now = datetime.now()
    name = "{}_{}".format(model_class.__name__, now.strftime("%y%m%d%H%M"))
    try:
        bucket = boto3.resource("s3").Bucket("hayashikun")
        with open(os.path.join(GitPath, "refs/heads/master")) as f:
            commit_hash = f.read()
        body = {
            "name": name,
            "datetime": now.isoformat(),
            "commit": commit_hash.strip()
        }
        bucket.put_object(Key=os.path.join(S3Path, name, "train.log"), Body=json.dumps(body))
    except Exception as e:
        print(e)
        return None
    return name

def upload_result(name):
    bucket = boto3.resource("s3").Bucket("hayashikun")

    for root, dirs, files in os.walk(os.path.join(OutPath, name)):
        for file in files:
            if file.startswith('.'):
                continue
            local_path = os.path.join(root, file)
            relative_path = os.path.relpath(local_path, OutPath)
            s3_path = os.path.join(S3Path, relative_path)

            with open(local_path, 'rb') as f:
                bucket.put_object(Key=s3_path, Body=f)
fetch_logとlog_listはS3に保存されたデータをローカルでjupyterとかから引っ張ってくるためです。
def fetch_log(name):
    log_path = os.path.join(OutPath, "{}.log".format(name))
    if not os.path.exists(log_path):
        bucket = boto3.resource("s3").Bucket("hayashikun")
        bucket.download_file(os.path.join(S3Path, name, "log"), log_path)
    with open(log_path) as f:
        return json.load(f)

def log_list():
    bucket = boto3.resource("s3").Bucket("hayashikun")
    result = bucket.meta.client.list_objects(Bucket=bucket.name, Prefix=S3Path + "/", Delimiter='/')
    return [p["Prefix"].replace(S3Path, "").strip("/") for p in result.get("CommonPrefixes") if "Prefix" in p]
実行
マシンはEC2のp2.xlarge (Deep Learning AMI (Ubuntu) Version 8.0)をスポットインスタンスで借りて使いました。(Webサーバーじゃないので別にどこでも良くて、アメリカのが安いので近そうなオレゴンにした) だいたい1時間30円程度でした。
インスタンスを立ち上げて、まずS3のためにaws credentialsの設定をします。
$ mkdir ~/.aws
$ vim ~/.aws/credentials
プライベートrepoだったので、githubからcloneするためにsshの設定をしてgit cloneします。
$ ssh-keygen -t rsa
$ git clone git@github.com:hayashikun/flowers_nobelium.git
諸々インストールする、そろそろpipenvを使うようにすべきかなぁ。
$ pip install --upgrade pip
$ pip install -r requirements.txt
訓練する。 (mkdirはpythonでやるようにしたかったけどめんどかった)
$ mkdir -p /home/ubuntu/.chainer/dataset/pfnet/chainer/models/
$ nohup python train_model.py -g 0 > stdout.txt &
$ tail -F stdout.txtでぼちぼち見ながら完了したらスポットインスタンスを落として、後でじっくりlogをみるという感じ。
結果
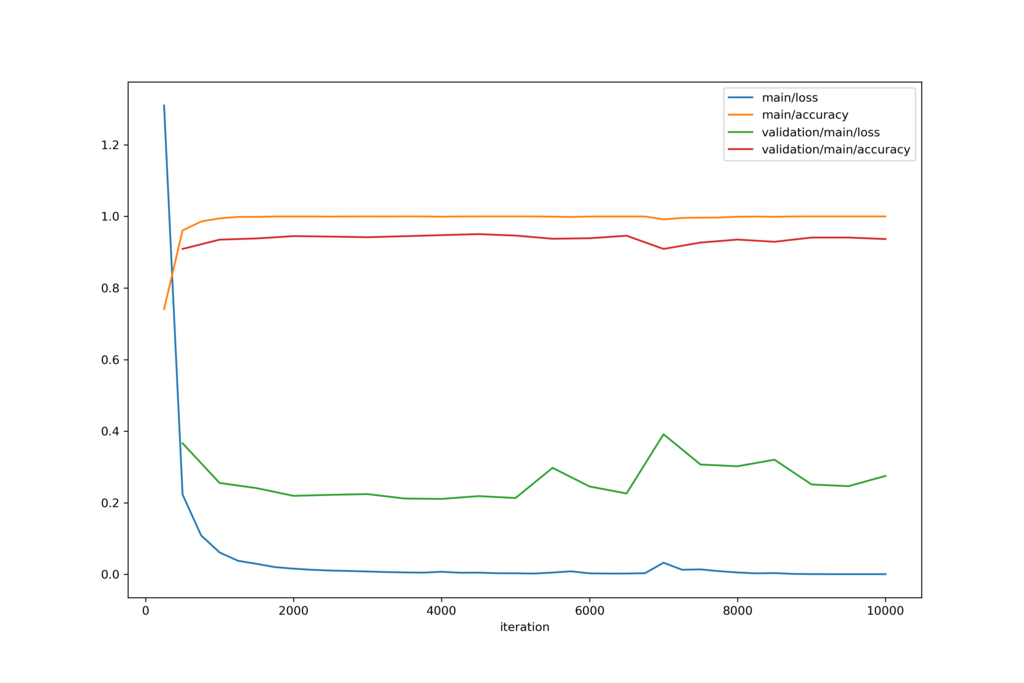
50世代ほど計算させた結果です。

割と一瞬で収束した。
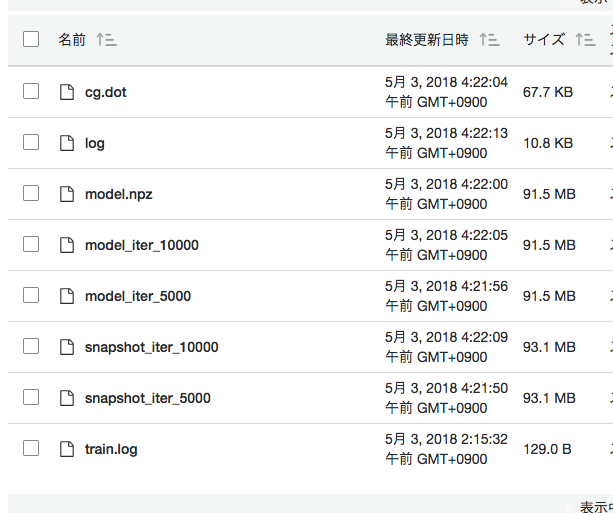
S3に上がってきた結果はこんな感じ。

10000iterで2時間程度なので、30分くらい15世代くらいの訓練で十分だった。
ここからもっと精度を上げようと思うと、別の層をファインチューニングするか、別のモデルを使うかという感じになるのかな。
ここからもっと弄るのもいいけど、次に移ってなんか別のことをしたい。
感想
意外と簡単だった。 研究でも微分積分畳み込みはよく使うので、理解もそんなに辛くはなかった。
あと、GPUはすごい。